C2C Adaptation Tips
C2C: these 3 letters could bring up all kinds of feelings for you.
The C2C resources for Languages, written by Education Queensland and released between 2016 and 2019, cover the F-10 sequence of the Australian Curriculum for Languages. For all languages, the Curriculum is organised in Bands of 2-3 school years, and the C2C resources also follow this structure. They assume that schools allocate the recommended time for Languages teaching, and that students have learned the language since the Foundation stage.
For most of you, there’s a good chance that one or both of these conditions is not met. In the Primary sector, you’re likely to have students starting a language in Year 5 and having less than the recommended time. And in the Secondary sector, even if you have the recommended contact time, chances are at least some of your Year 7s haven’t studied your language before.
This means that for many Languages teachers, C2C is not an off-the-shelf solution. But the resources can save you from having to create everything from scratch if you know how to work with them.
The scope of this document is not to pass judgement about C2C resources - it’s here to give you some ideas about how you might be able to adapt the resources to work within your school context, and leverage them in a way that benefits you and your students. This is especially useful for teachers working in schools that insist their staff use C2C, but could be of interest to teachers in other schools as well.
You may be thinking:
“How do I know you’re the person I should listen to about this?”
I was involved in writing the C2C units for one of the 6 languages, so suffice to say, I know the resources very well!
I have also taught in a Primary school where I had only 40 minutes a week with students from Prep to Year 6, so even before considering transition time at the start and end of the lesson, my students got far less than the recommended time. In my school, I was asked to use the C2C assessments, but how I got my students to that point was up to me.
So not only do I have extensive knowledge of the C2C resources, I have used them myself in a situation where languages were under-timetabled. So I’ve probably experienced the same struggles you have, and I want to share with you what I’ve learned about making C2C resources work in a less-than-ideal situation.
A step-by-step process
In the next few pages I will take you through a step-by-step process that may help you use the C2C resources in a way that works for you and your students.
Before we get started, I’d like to make it clear that my approach is GREATLY simplified - so it may not be considered “best practice” by some. I was fortunate that my school allowed me to make my own way to the assessment task, but I still had only 40 minutes a week. To make my job achievable, I prioritised covering the Achievement Standards over the Content Descriptors when planning my lesson sequences. As I said, it may go against the grain, but given how little time I had to work with, something had to give.
If your school insists that you use C2C resources, it might be worth asking if they would be prepared to compromise and allow you to use the assessments ‘out of the box’ but with a bit of flexibility on how you get your students to that point. This would also allow the C2C assessments to be used with different teaching methods and pedagogies, because as long as the crucial content and skills are covered, how that is delivered is up to you!
I will now take you through the process I used to select C2C assessments that would cover as much of the Achievement Standard as possible in my limited time allocation. The steps below assume the assessment will be used as-is, with the resources being adapted or replaced as appropriate.
Step 1: Work out what percentage of the recommended teaching time you have.
If you don’t have the recommended time allocation for your language classes, I hear you. I took the approach that I would cover the curriculum pro rata in accordance with the time I was allocated. So you may like to start by figuring out what proportion of the recommended time you actually get in your school. From Prep to Year 2, the recommended time is 60 minutes a week, in Years 3 to 6 it’s 90 minutes, and 120 minutes a week for Years 7 and 8.
In my case, the 40 minutes I had for Years P-2 worked out as ⅔ of the recommended time for that Band, so I would aim to cover at least two-thirds of the Achievement Standard. For Years 3-6 I only had 44% of the recommended time allocation, but I decided to round it up to 50% of the Achievement Standard for each of these bands. Obviously I would cover as much as I could, but this was the minimum I aimed for. I did this by completing 3 C2C assessments per year in Years P-2, and at least 2 per year in Years 3-6.
This did have implications for reporting - my school reported on students twice per year, so often I had only covered one assessment by Semester 1 reporting time. My rationale was that as the assessment covered both strands (Communicating and Understanding), one assessment per semester should suffice. For the grades in which my students completed 3 assessments per year, the Semester 2 reports would include the results from 2 assessments, covering a greater range of skills. On balance I felt that this worked to give an accurate picture of student achievement over the course of the year.
Step 2: Work out which assessments to prioritise.
Once you’ve figured out how much of the Achievement Standard you can realistically cover, you can figure out which assessments to prioritise.
You may already know this, but the C2C assessments for each band cover all parts of the Achievement Standard at least once, but some are covered multiple times.
A good starting point for prioritising assessment is to plot which parts of the Achievement Standard are covered in which units. This allows you to see which are the most important assessments to try and cover - usually because they include a part of the Achievement Standard that isn’t assessed anywhere else.
You can find which parts of the Achievement Standard are assessed in which units in either the C2C Band Plan or in each Unit Plan.
I start by copying and pasting the Achievement Standard into a table, one sentence per row. I add a column where I can record the unit in which each part is assessed. This shows me where the duplicates are, and also which parts are only assessed in one unit. I can then use this information to identify the priority assessments in the Band.
Below is an example of what this looks like for the Year 5-6 Band for Italian:
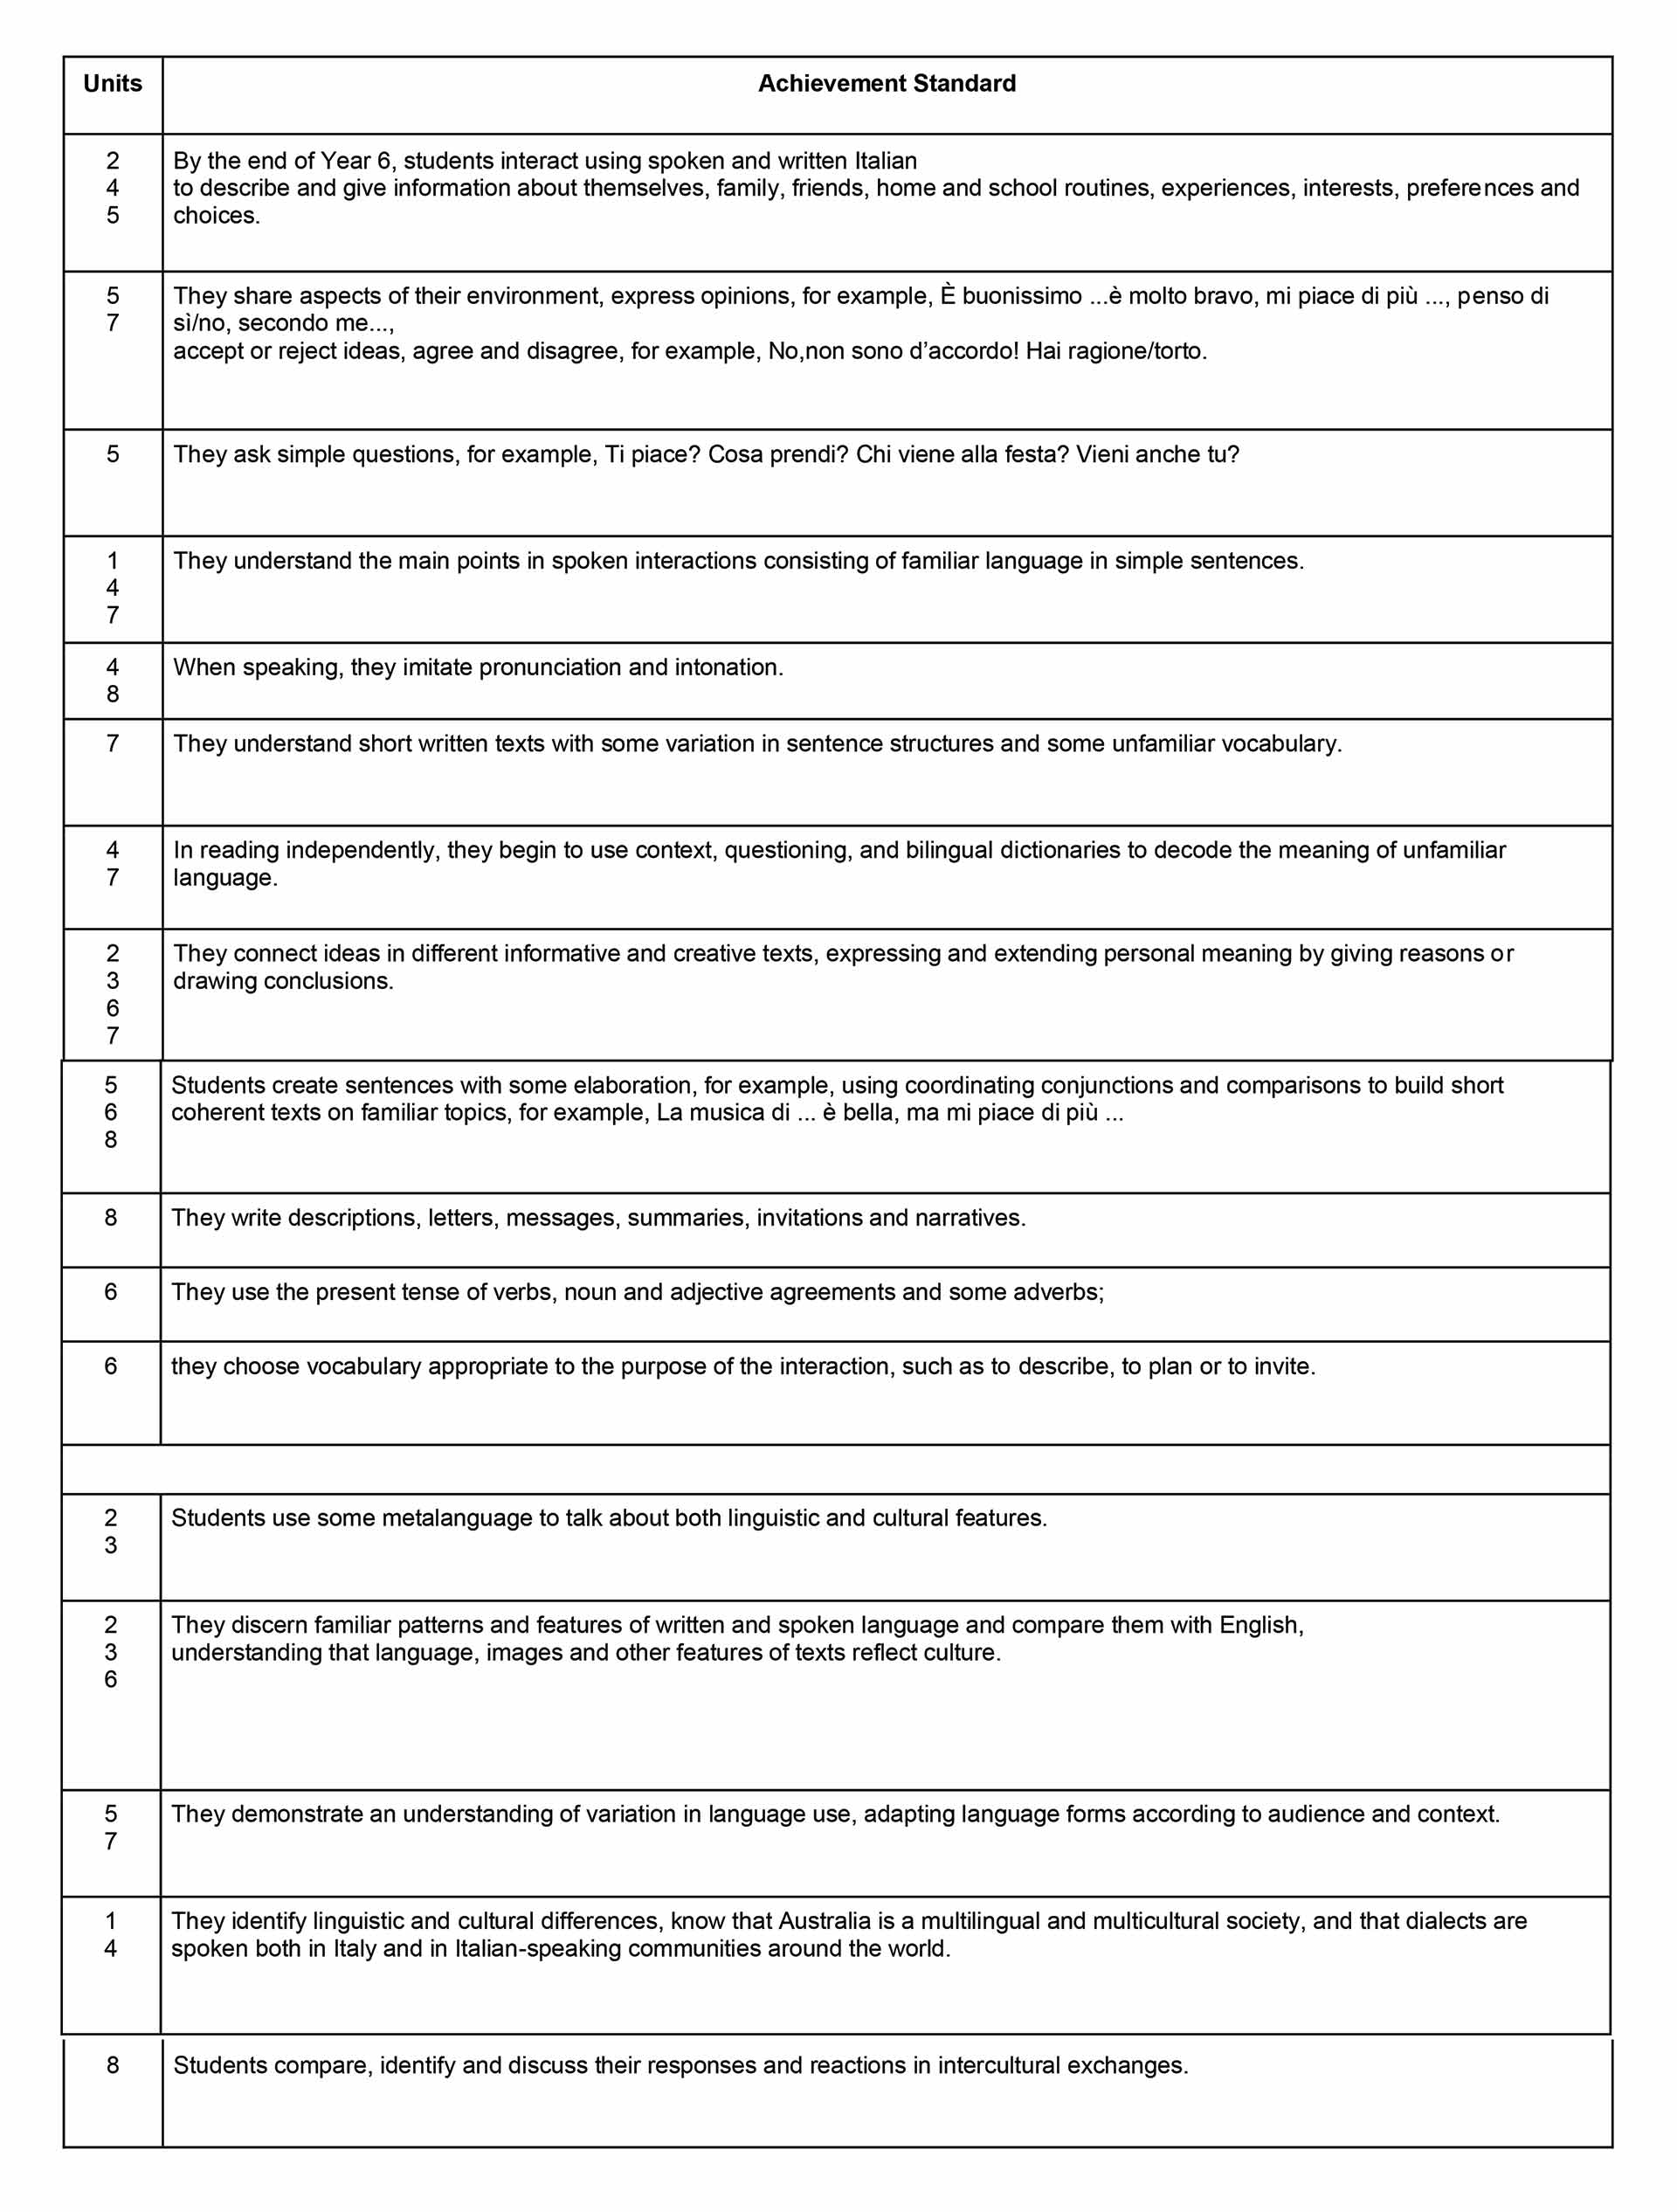
As you can see, the units that assess part of the Achievement Standard not covered elsewhere are Units 5, 6, 7 and 8.
This doesn’t mean you MUST do the assessments for these units - if there are other assessments you prefer, by all means choose those! As we’ve already seen, if you don’t have the full time allocation, you physically can’t cover everything. The idea is to make an informed decision about the units you choose.
Step 3: Choose and sequence your assessments.
Now you know what percentage of the Achievement Standard you can realistically cover given your time allocation, and which units you may wish to prioritise, you can start to choose your assessments for the bands you teach, and figure out a sequence in which you’ll complete them.
I am a visual person, so I like to get my mapping table from Step 2 and compare it to the assessment overviews in the Band Plan to see which could work.
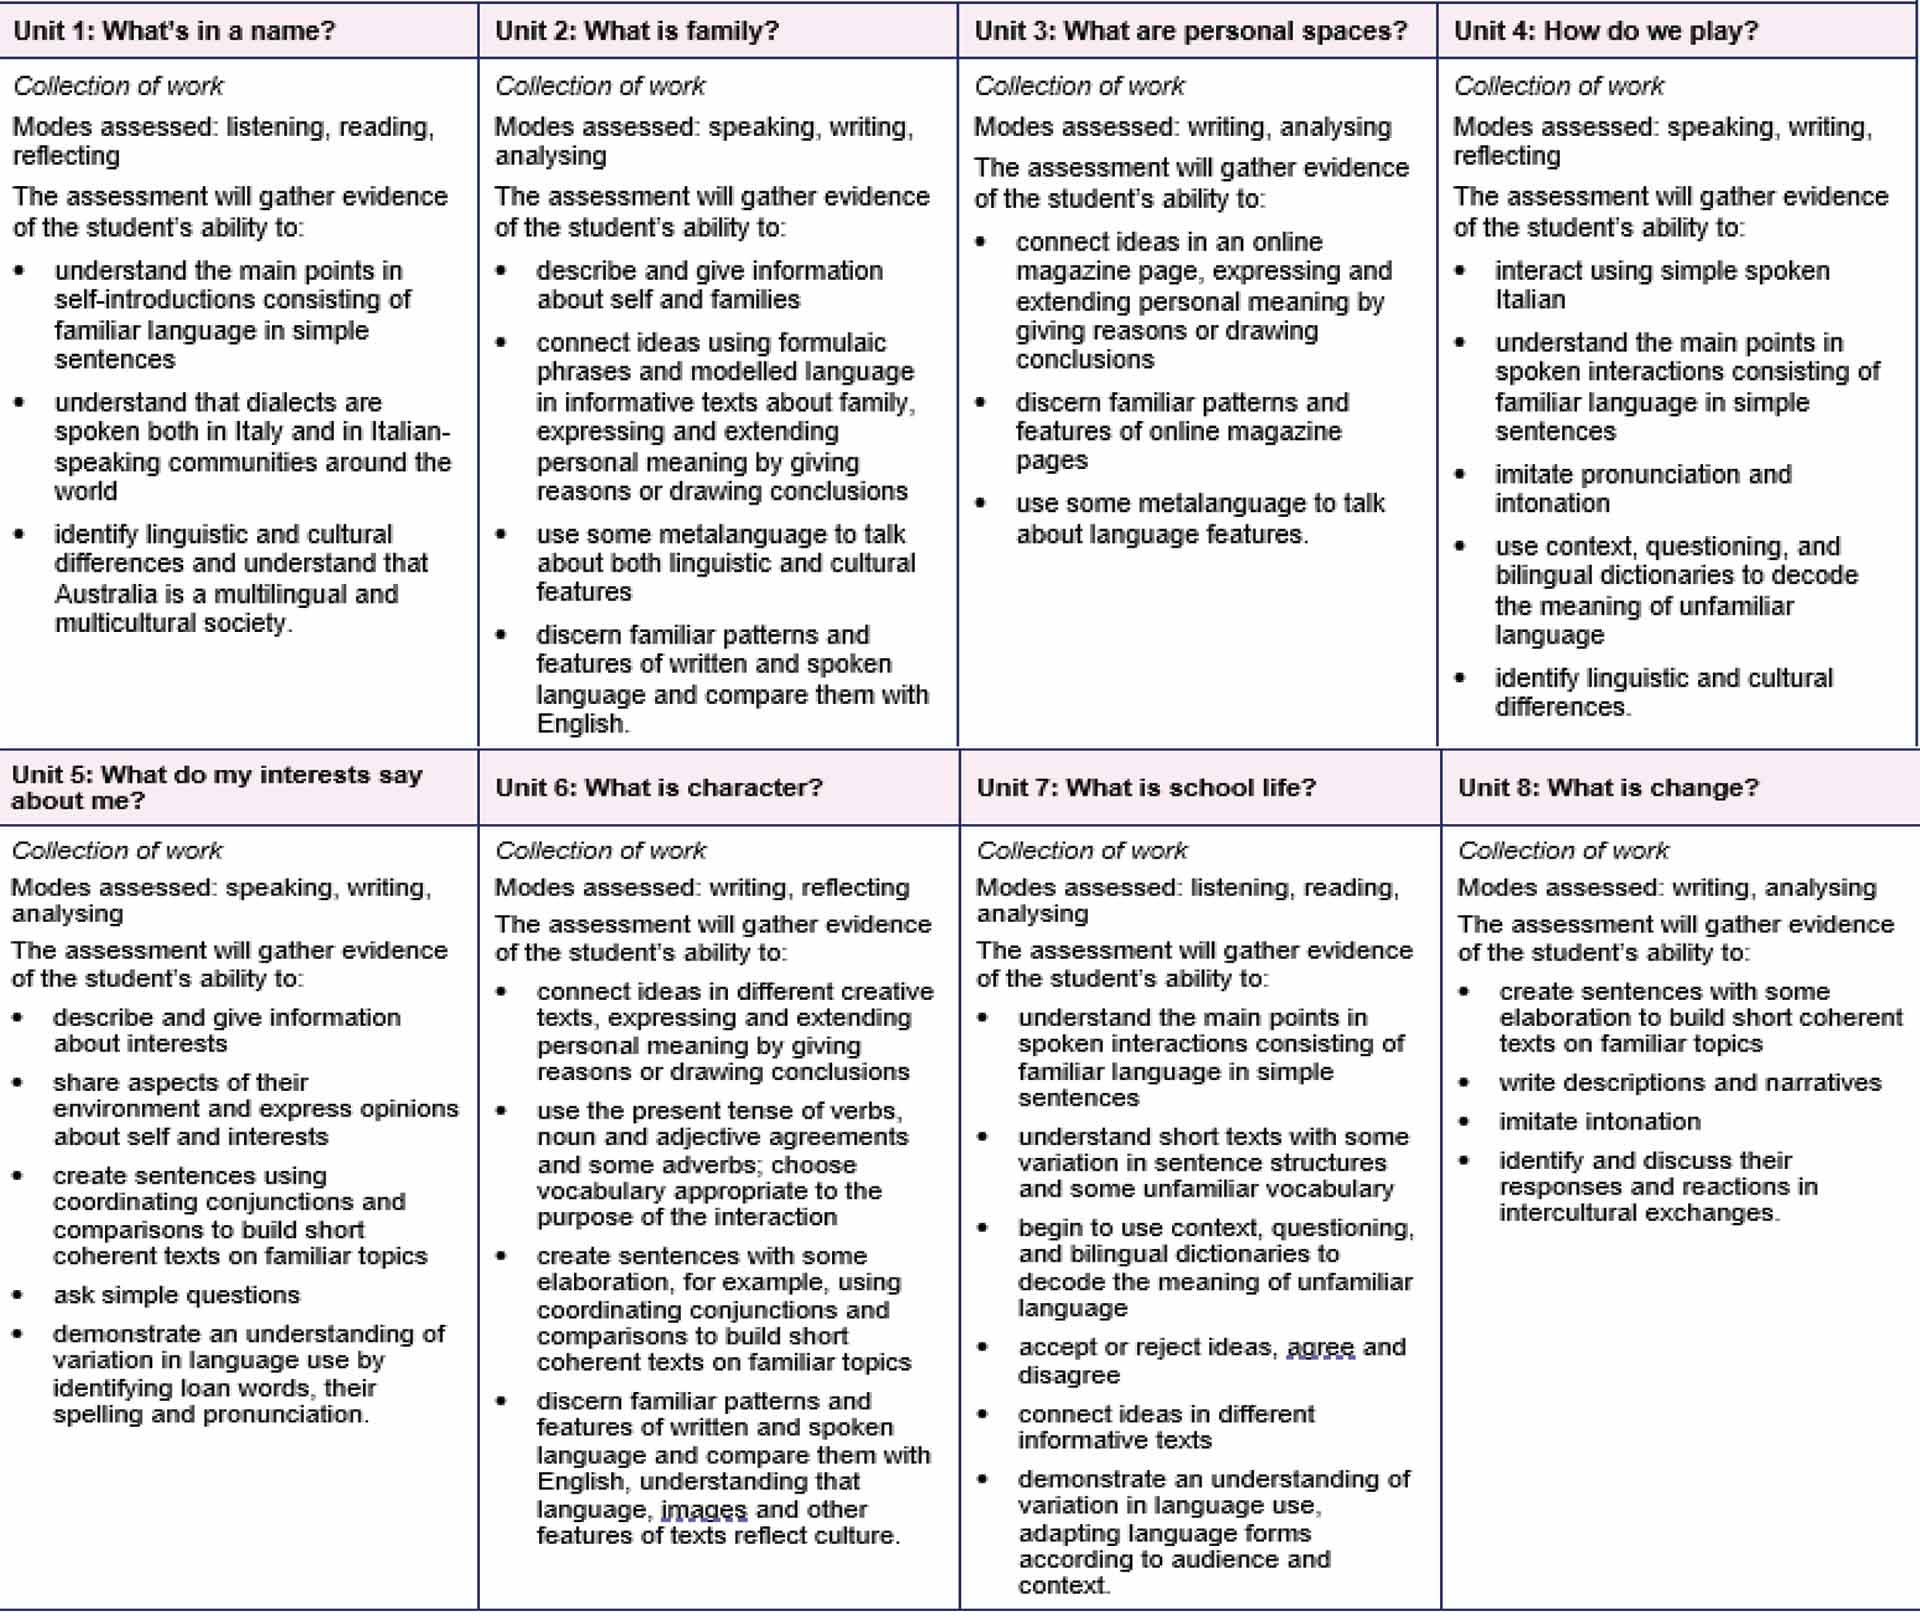
Below is an example of the assessment overview from the Italian 5-6 Band Plan:
Another tip I have here - which is entirely personal - is to organise your assessment schedule so you have a receptive assessment in Semester 1, and a productive assessment in Semester 2.
I found this particularly helpful in Years 5 and 6, as my students typically found assessments based around listening and/or reading easier, which built their confidence. I also found I could cover the content my students needed more quickly, as it was focused more on vocabulary and listening / reading skills and practice.
By leaving the written assessment until Semester 2, I was actually able to start the unit in the last weeks of Semester 1. My assessments typically had to be finished by Week 7 of Term 2, in line with our reporting schedule. This enabled me to start working on the next unit in weeks 8, 9 and 10, giving me the full 20 weeks in which to prepare my students for the written assessment and have it finished by Week 7 of Term 4.
Looking at the Band Plan, I can see that Units 1 and 7 have listening/reading assessments, so I’ll keep these in mind for Semester 1 of Year 5 and Year 6. Unit 7 has parts of the achievement standard not assessed elsewhere, so it’s definitely a contender.
Assuming I choose these units, I shade the parts of the Achievement Standard this will cover to help me choose which other units might work. Once I highlight the Achievement Standards covered in Units 1 and 7, my mapping table looks like this:
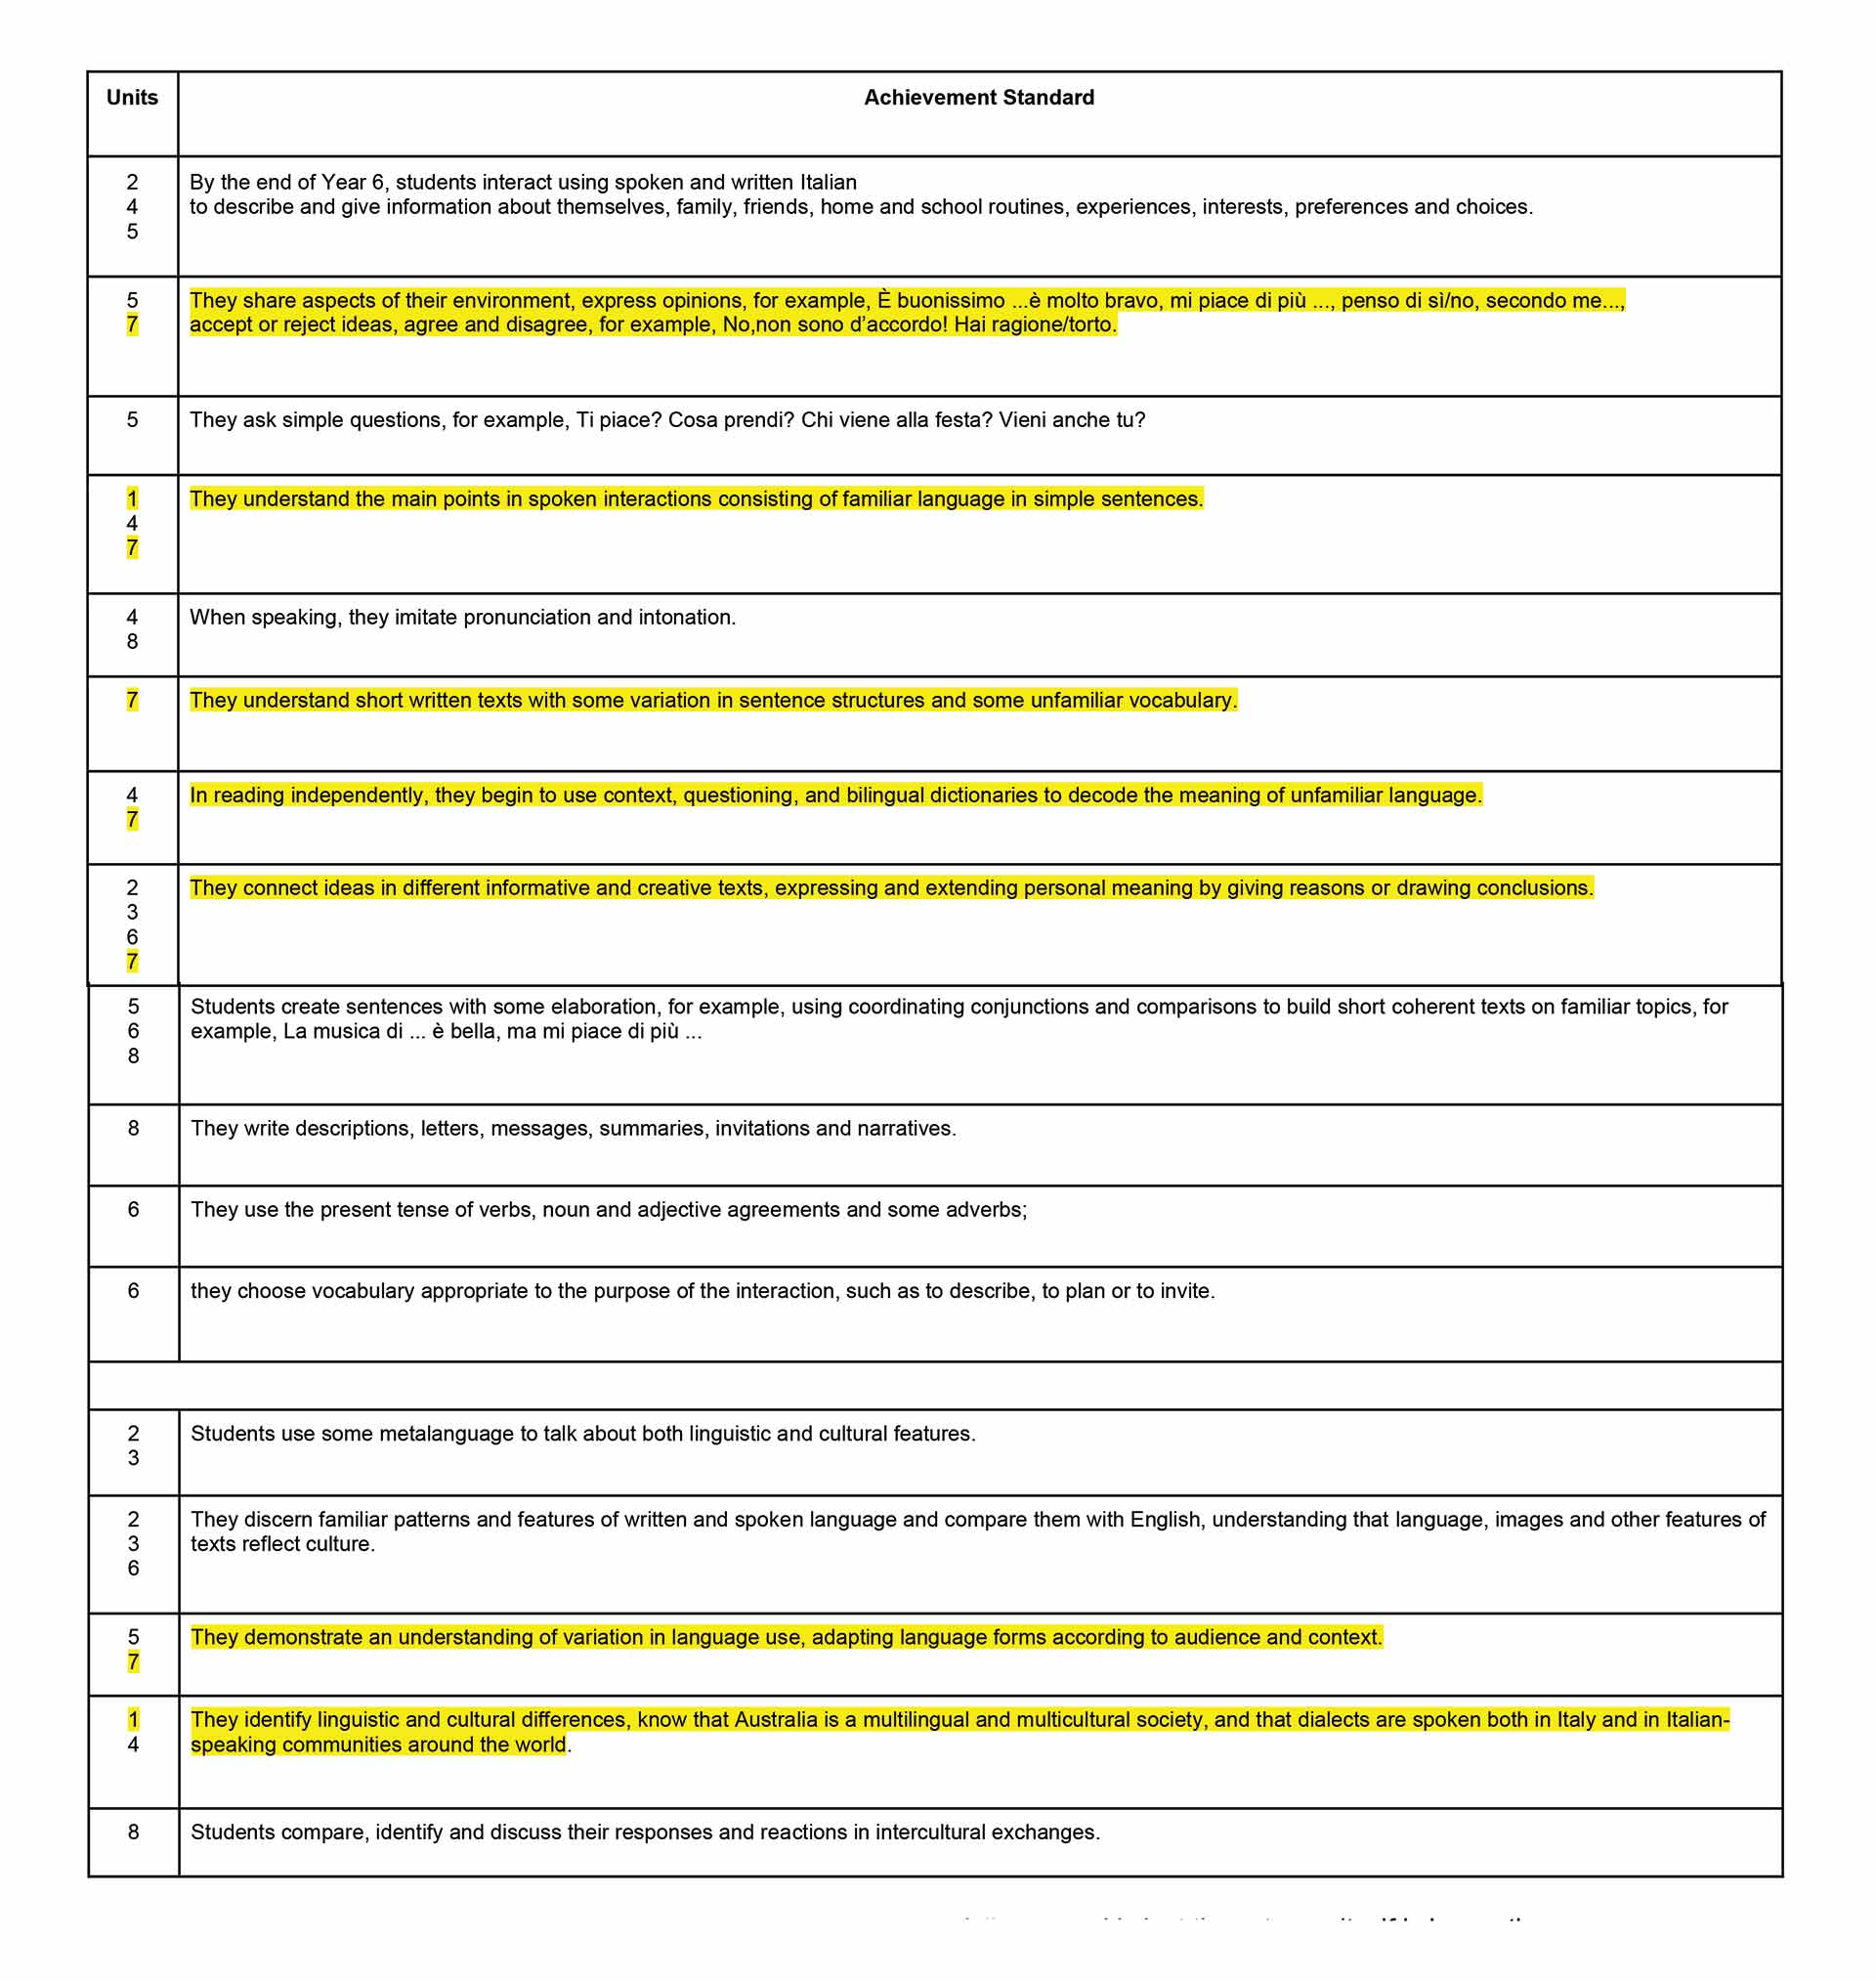
Out of the 17 different parts of the Achievement Standard, 7 are at least partially covered in just these two units. If I choose these assessments, I’m already well on the way to covering at least half of the Achievement Standard! This gives me some flexibility to choose the units for Semester 2 that I think will be the most engaging for my students. Whichever assessments I choose, I know that there will be a written component which will give me a good balance of macro-skills.
Looking at the remaining parts of the Achievement Standard and the corresponding units, Units 2, 6 and 8 jump out at me - Unit 2 because ideally I’d like to have an early band unit for my year 5s and there’s not too much duplication of the Achievement Standard assessed, and Units 6 and 8 because they cover several parts of the Achievement Standard not covered elsewhere.
Looking at the topics, these units cover family (Unit 2), comic characters (Unit 6) and life changes (Unit 8). Out of these topics, I think Units 2 and 6 have the potential to be engaging, so I’m going to highlight these in my mapping table.
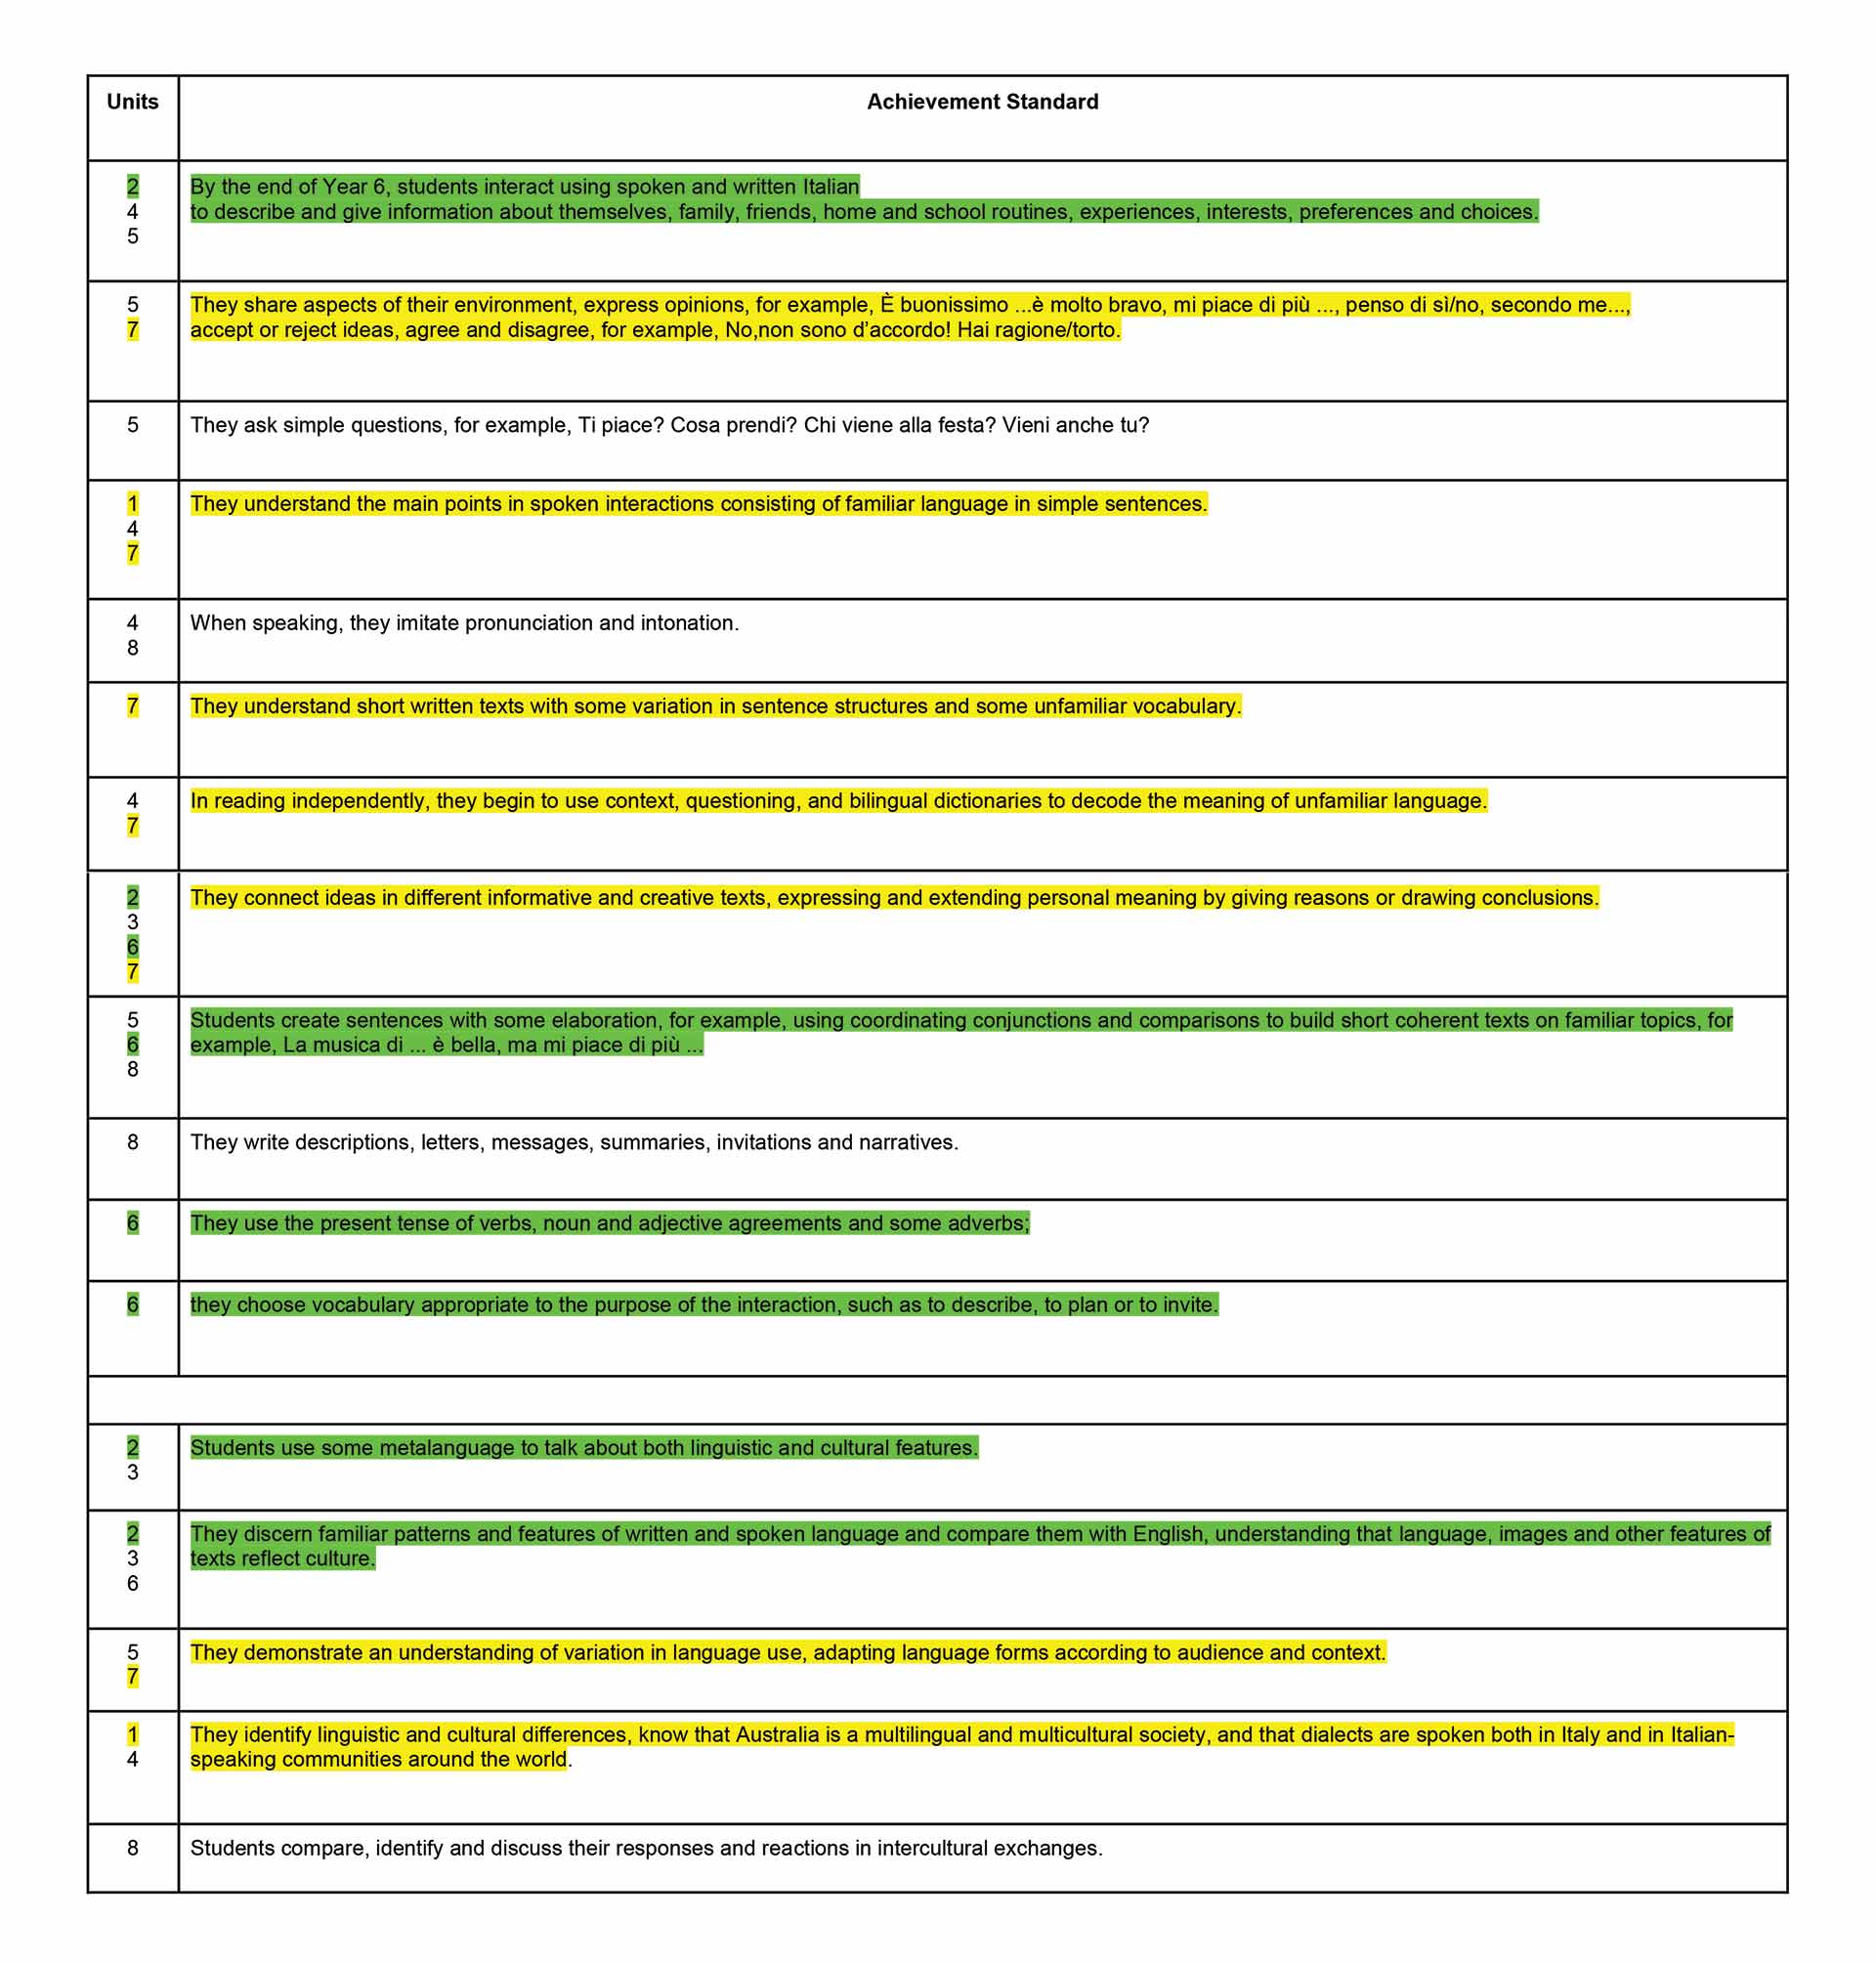
As you can see, this only leaves 4 out of 17 parts of the Achievement Standard that I won’t be assessing - and considering I have less than 50% of the recommended time, I am happy to be able to cover so much of the Achievement Standard from just 4 assessments!
To summarise, my overall plan for my Year 5 and Year 6 students looks like this:

Step 4: Establish the key learning for your chosen assessments.
Once you’ve chosen and sequenced your assessments, the next step is to figure out how you’re going to get your students equipped with the knowledge they need to tackle them.
As my starting point, I take a look at the assessment and identify what language and structures come up. I use this information to identify broad topic areas which will form the basis of my teaching sequence.
Let’s use the assessment for Unit 1 as an example.
I go straight to the Guide to Making Judgements (GTMJ) so I can see what I’ll be looking for when I’m marking the assessment:
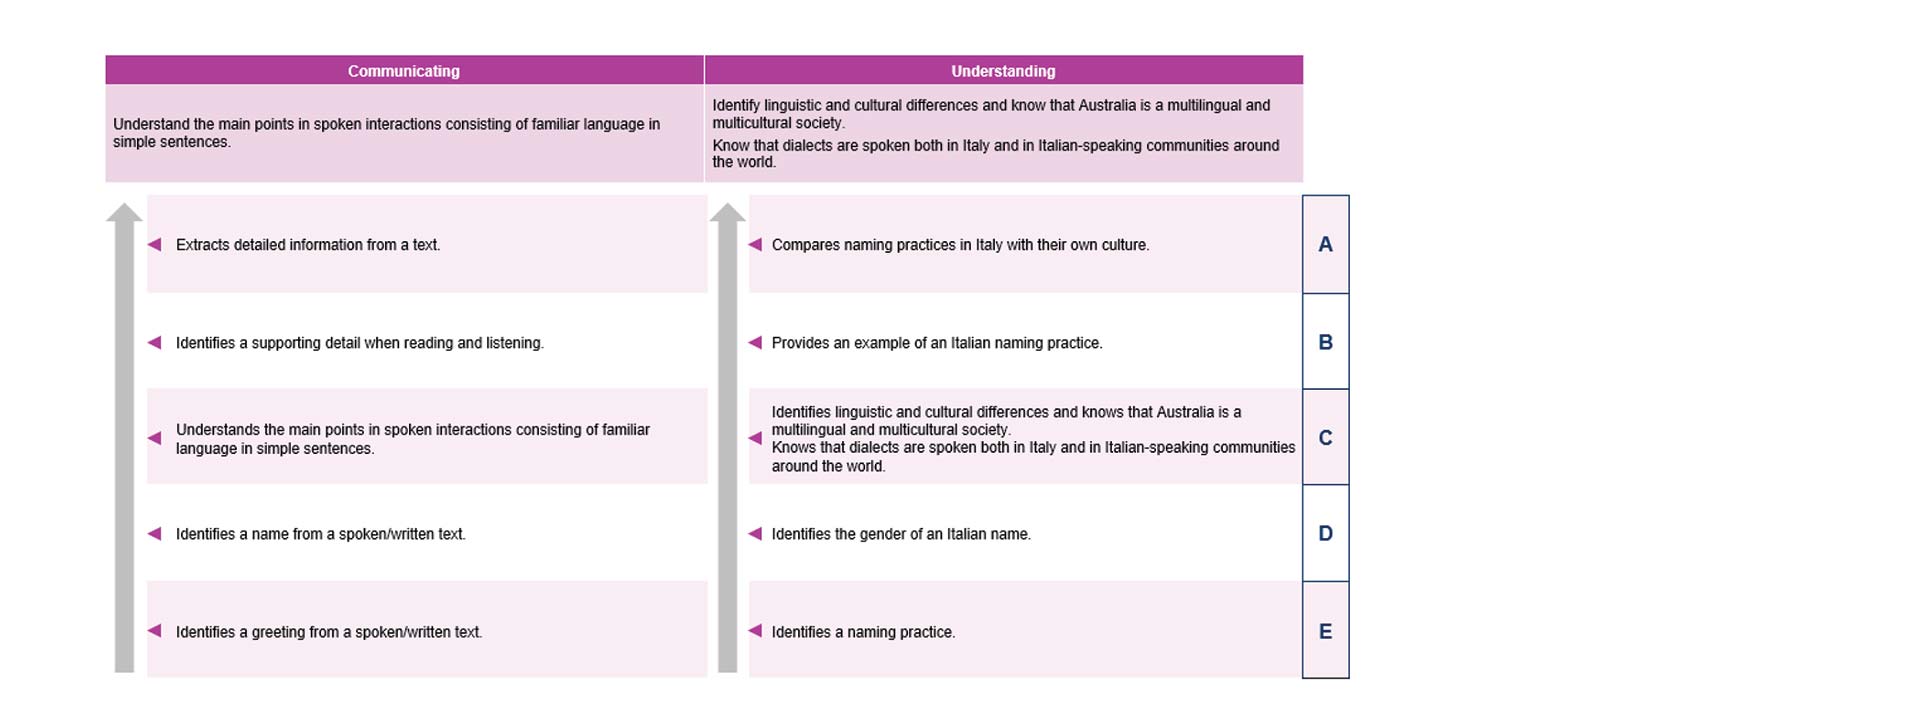
Under Communicating, I can see that my students will need to know greetings, asking about and giving names, plus other details from the text. This is a bit vague, but looking at the assessment text I can see that the speakers introduce themselves and discuss the origins of their names. At first glance it looks like the vocabulary topics I’ll need to cover are introductions, the different names we may have (first name, last name, nickname etc), people in our family, and the origins of names (including countries).
Under Understanding, I can see that my students will need to know about naming practices, gender of Italian names, and dialects, and they will need to compare languages and cultures. I can see that I will need to cover how Italian names work (including the gender of names), cultural approaches and conventions around naming children, and comparison skills. I can also see that I will need to give students some information about the existence of dialects in Italy.
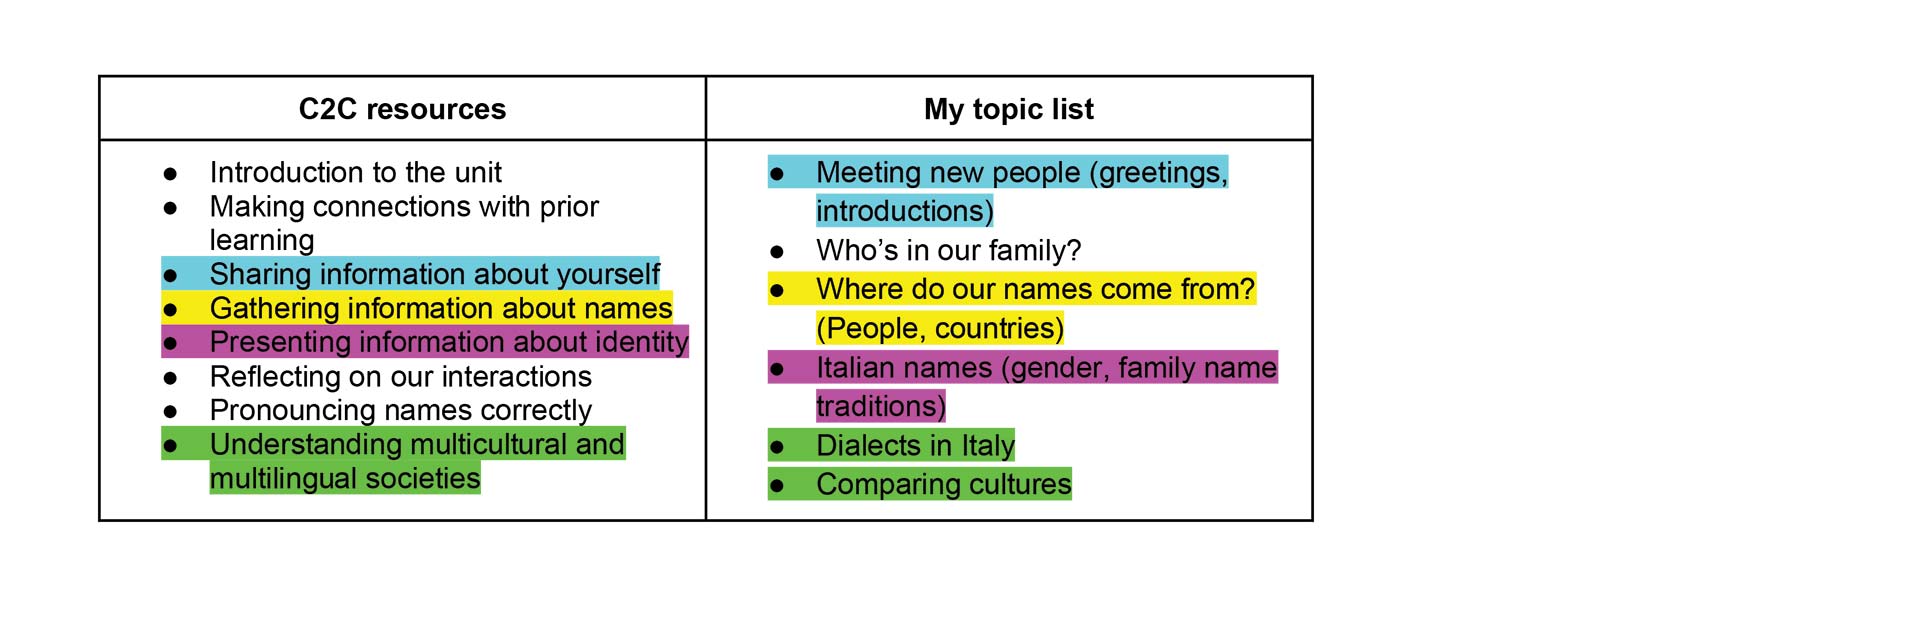
From this, I can start drafting an initial list of topics:
- Meeting new people (greetings, introductions)
- Who’s in our family?
- Where do our names come from? (People, countries)
- Italian names (gender, family name traditions)
- Dialects in Italy (including an introduction to regional Italy)
- Comparing cultures
This has the potential to be accessible even to students who begin Italian in Year 5, because it covers some of the ‘traditional’ starting points of greetings, self-introductions and family. It also includes an introduction to Italian culture and to the grammatical convention of gender in an accessible and relatable way.
Step 5: Resource your unit.
Once you have a rough idea of the topics you need to cover, you can decide whether you want to use the C2C lessons, create your own from scratch, or adapt the C2C lessons to work with your teaching style and your allocated teaching time.
I understand that not everyone will work in the same way when it comes to planning or resourcing their lessons. My personal preference is to create a powerpoint to support the lesson sequence so I don’t have to spend valuable time writing too much up on the board. Also, a consideration for my planning was that my students had an exercise book rather than a laptop.
The following process assumes that each lesson will have a detailed slideshow to present the key learning. If that’s not how you like to work, you may need to adapt this process so it works for you.
I am sure everyone has their own perspective on the C2C resources, and as previously mentioned, the purpose of this document is not to pass judgement. No matter what you think of the C2C resources, they do have some positive points which you may be able to leverage to your advantage:
- They already exist so you don’t have to start from scratch, saving you time.
- The avatar characters are cute!
- The interactive resources are useful for teaching listening skills, and are well-supported with images.
- The documents are editable, so you can add animations and pictures, and add or delete slides - whatever you like!
I have sometimes combined content from multiple C2C presentations, cherry-picking the best bits, and adding slides with mini-activities to practise the new content. For other topics that I didn’t feel were covered sufficiently in the resources, or for topics where my students didn’t have the assumed prior knowledge, I created my own presentations - such as to teach the vocabulary for countries and nationalities in Italian.
Let’s take a look at the C2C lessons for this unit, and compare it to the topics I want to cover:
There is some potential overlap, so I can start by looking at the powerpoints for these C2C lessons to see if there are any sections I feel I could use.
I’d like to include a note here about the C2C Languages ‘Making connections with prior learning’ slideshows. I have often adapted these to teach the content from scratch, as I know for my students it’s not actually prior learning. I’d like to share with you how I turned these ‘prior learning’ slideshows from Unit 1 of the 5-6 Band into resources that teach the content for the first time.
Unit 1 has two Prior Learning slideshows that cover a lot of information. As this would all be new content for my classes, I needed to prioritise. I went through both and pulled out the sections I thought could work for my topic list in the table above - asking and giving your name and age from slideshow 1, and asking about birthdays, where you live and family from slideshow 2.
I changed the wording of the slides to reflect the fact that my students may not have learned this language before, exchanging phrases like “Do you remember how to say…” for questions such as “Can you spot how to say…”
I then supplemented this with extra information about numbers and months, and added activities to allow students to practise the phrases with each other. And just like that, I had the foundations of a lesson (or series of lessons) on self-introductions.
I then checked through the remaining resources - even the ones that initially didn’t look like they would overlap. Sometimes I have just taken one section out of one C2C powerpoint and popped it into a different one, or I have created some “mash up” slideshows by mixing and matching different C2C sections with my own. You can be as creative as you want - and use as much or as little of the C2C slideshows as you like.
And remember, as long as in the assessment the students can understand the main points of a spoken or written text, are aware of dialects, and can show that different countries have different cultures and customs, they are on track to meet the C grade benchmark.
That almost brings us to the end of our C2C Adaptation tips. I hope that this information will assist all my wonderful Languages colleagues out there to work with the C2C resources in a way that helps rather than hinders!
But wait… There’s more!
BONUS INFORMATION: How to adapt the C2C interactive resources
The C2C slideshows aren’t the only resource you can change to suit your style - you can also adapt the interactive resources. While the interactive resources in themselves aren’t easily editable, when you download these resources the accompanying folders are a goldmine of images and sound files that you can easily reuse, as long as you know what to find where!
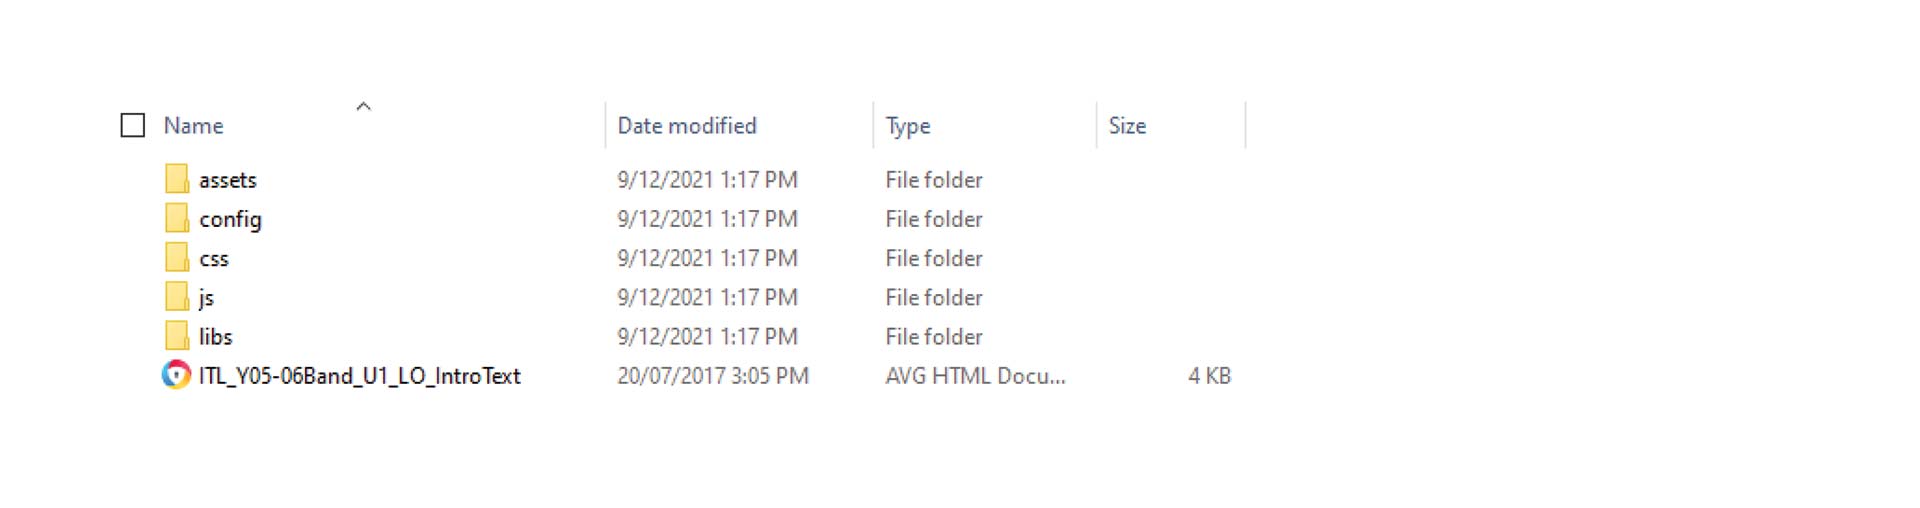
The folder that contains the interactive resource also contains several sub-folders which house the resource’s components - the images, the audio and the behind-the-scenes wizardry that turns them into an interactive resource. The folder for the interactive texts look something like this:
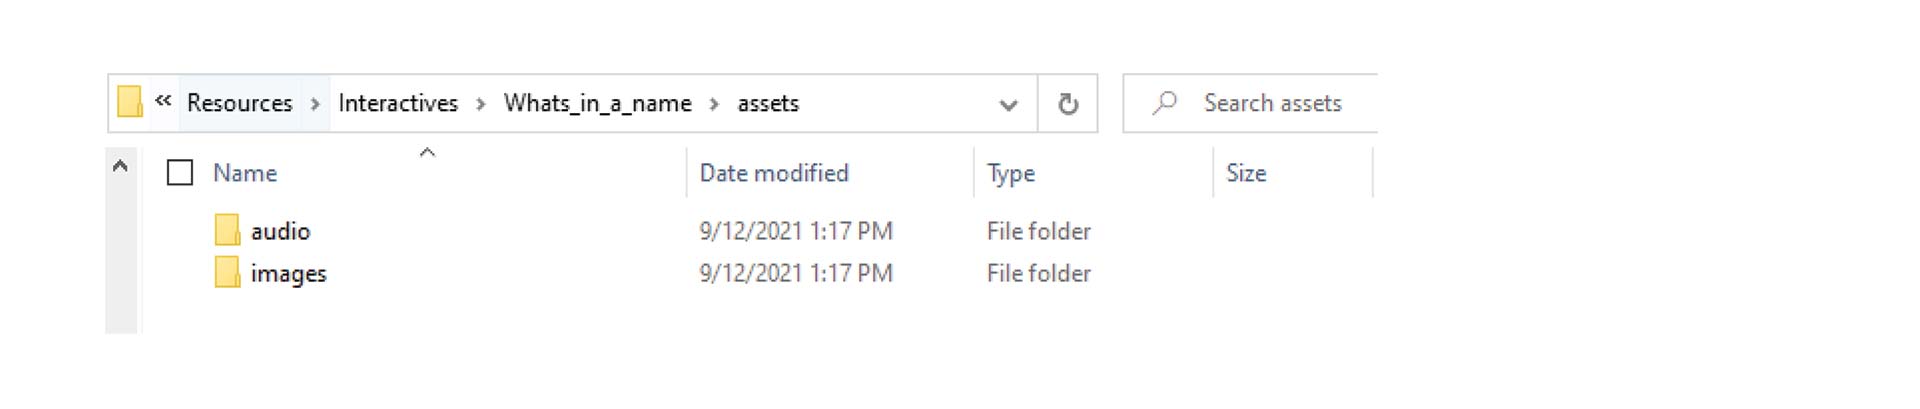
The folder I would like to draw your attention to is the assets folder. This is where you’ll find the images and the audio to go with each individual page:
You can use these individual images and audio clips to make a shorter version of the interactive resource - perhaps if you want to zero in on a particular part of a conversation for a short listening activity, or if you just don’t have time to go through the whole thing.
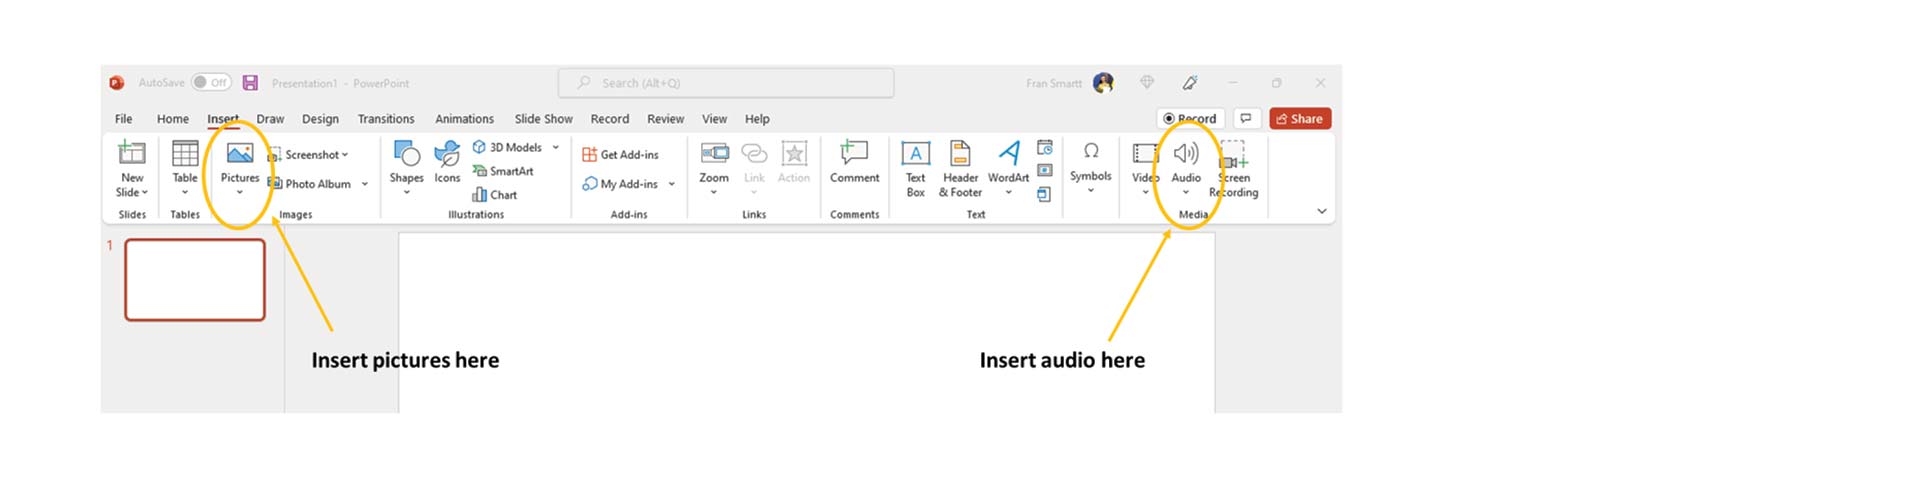
You can easily insert the images and audio into a slideshow to create your own interactive resource. Just go to the Insert tab at the top and you can either insert a picture or audio from your computer.
If you are quite tech savvy, you can even edit the audio using programs like Audacity. This is especially useful for the resources where one audio file goes with several images.
And that’s a wrap for our C2C Adaptation Tips! We really hope you find the ideas useful, but as always if you have any feedback or suggestions we’d love to hear from you!
Author Bio: Fran Smartt
Fran is a Modern Languages graduate (Italian and Spanish) from the University of Bristol, UK. She trained as a Secondary Languages teacher in London, covering studies in Second Language Acquisition as well as practicums teaching French and Spanish at schools in Forest Gate and Tottenham.
After graduating in 2012, she worked for an all-through school in North-West London teaching Spanish across Years 4 to 11 (equivalent to Years 3 to 10 in Australia). In 2013, she was promoted to Deputy Subject Leader for Spanish.
Fran relocated to Australia in 2015, and has taught Italian in a High School and two Primary Schools on the Sunshine Coast in Queensland. She also spent 18 months working as a Senior Project Writer for C2C.
In early 2021, Fran became interested in Copywriting and Content Marketing, studying the subjects in her spare time and working as a casual intern for a Digital Marketing Agency. She joined the Languages Roadshow team in January 2022 to leverage her love of writing and her Language teaching experience and expertise in support of the wonderful Languages teachers of Australia.